Personal Branding with a Domain Name on a Student Budget
I’ve written a brief guide (including step-by-step on all the technical aspects) that will help you improve your online branding on a student budget. Specifically, for just the cost of registering a domain name (~$8-10 USD / year), I really wanted to illustrate how cheap and easy it is to nab a domain name for your personal use, so you can use it for professional emails (e.g. hire@johnli.com) and have curious recipients who access johnli.com, be redirected to your LinkedIn page.
Some Thoughts on Online Branding
Branding is delivering a message about something. Personal branding is about telling people about yourself. It’s 2020, face it, you’re going to need to put yourself out there in the world in order to get noticed and find great opportunities. First impressions are everything. It’s essential to put your best foot forward when meeting with potential employers. That’s why people dress in business formal for interviews, right?
As the economic and employment outlook for late 2020 becomes ever more dismal, it makes it all the more important that you manage your online presence and make yourself accessible. Finding employment is tough in this economy.
Domain Names
A domain name is an address of a website. When you type www.google.com, you are typing in a domain name. Anyone can register a domain name that has not already been registered by someone else.
A personal domain name is incredibly flexible and useful tool when developing your online professional branding. It’s cost-effective, costing only the equivalent of a couple cups of bubble tea per year to register/renew a .com or .ca domain name. There is only ever one of each domain name. If someone else registers it first, you’re unlikely to ever get ahold of it ever again. The use of personal domain names is still rare, making it quite noticeable when someone receives your email.
You can use a personal domain name in a lot of different ways. You can use it to create a Vanity email address, (e.g. emails using @johnli.com). You can, obviously, use it as a website. You can also have it redirect a user to another page on the Internet. If you’re going to set up an email, you’ll probably want the domain name to point to something, because it’s more complete than having a domain name that leads to a parked page, so my guide includes instructions on setting up a redirect.
Domain Name Registration
To register a domain name, you’ll have to make sure it’s available for registration. You can do this by searching it at a Domain Name Registrar, a business that brokers the reservation of domain names.
For cost reasons, I register most of my domain names with
NameSilo. My guides further on will use screen captures from NameSilo, as that is what I’m familiar with, but it’s not at all required. If you use the coupon code NS1$, you will also get a further $1 off your first order for many top-level domains.
Deciding upon a domain name is often difficult (but don’t worry, you can register for as many as you have space in your wallet!). Let’s say your name is John Z Li, here are some ideas on possible domain names, including usages of different top-level domains (“TLDs”),:
johnli.comLi.com(e.g.John@Li.com)john.li(.liis a top-level domain name available for registration)jli.comjohnli.cajohnzli.comjzli.com- Other TLDs such as
johnli.net,johnli.me,johnli.xyz,johnli.name,johnli.io(like many techies use),johnli.rocks,johnli.pro
Your first choice is probably using your name: firstlast.com. If it’s available because no one else with the same name has registered it yet, register it now and never look back. You’ll regret it if someone else registers it while you’re still thinking about it.
Otherwise, you’ll have to look at a plan B. Consider your first initial and your lastname, or adding a middle initial between your first and last names. You can also choose a different top-level domain such as .ca, .me, .io, .xyz or .name. Maybe even the first or last couple letters of your last name happens to be a top-level domain name like
eric.sh(ell).
*Cha-Ching*
Congratulations! You now own a domain name!
Redirect your domain name to your LinkedIn page
A redirect is an incredibly easy way to utilize a domain name without having to spend the time and money desiging and building one. Having it point to your LinkedIn profile is a great choice when you aren’t willing to spend the time or money to develop a website of your own (and sometimes, it looks better).
Example: lindayang.ca
Setting it up is super simple.
- Login on NameSilo if you haven’t already
- If you’re on the homepage, go to Account Home
- Go to Manage My Domains on the top right of the page
- Click the checkbox beside your domain and select Forward Domain (the picture of the green arrow)
- Select
https://in the first box and paste a link to your LinkedIn profile in the second, deleting the leadinghttps://if it was part of the link you copied - Under Forwarding Method choose Temporary Forward (302) and leave Path Forwarding on No
- You’re done! Don’t forget to make sure your LinkedIn profile is up-to-date and visible to the public
Note that your updates to the Domain Name System (“DNS”) Records will take some time to propogate across all the DNS Servers in the world, so don’t fret if you try it and the redirect doesn’t work right away. Give it a day, though usually you’ll see the updates within the hour.
Setting up Email Forward for Receiving (free)
An email forward is a one-way mechanism that allows you to have all emails sent to an address you control forward to another address. It’s very easily set up with most domain name registrars (including NameSilo) without having to pay extra costs. Email can be forwarded to any email address, and you can specify specific addresses you want to receive at, or receive all emails sent to your domain name.
- Login on NameSilo if you haven’t already
- If you’re on the homepage, go to Account Home
- Go to Manage My Domains on the top right of the page
- Click on the domain, then selecting Configure beside Email Forwarding
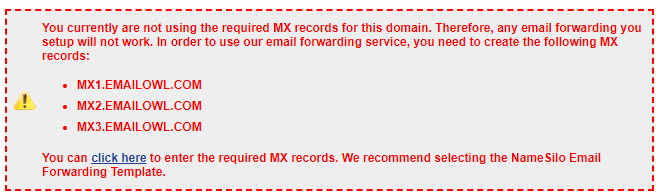
- If the red box as shown below appears on the page, hit click here and follow the additional instructions
- You’ll be taken to a list of all the Existing Resource Records, scroll down to the DNS Templates section, locate the row for Email Forwarding and press Apply Template
- NameSilo will preview the changes that the template will apply, Accept the changes
- Now, head back to the Email Forwarding page
- Fill out Email with the address at your domain name you want to receive (e.g.
me,hire), or just use a*if you want to forward all emails sent to any address at your domain name - Fill out Forwards To with the email you want it to go to. You can even forward to multiple emails if you want
Awesome! Give it a try by sending your new email at your domain name using an account other than the email you’re going to receive it at. Note that it may take a day for the changes to the DNS Records to take effect, though it usually should work within the hour.
Note that sending an email can only be done out of Gmail (for free), so if you want to be able to reply and get a copy to your preferred email address, consider registering a free Gmail account and setting up Step 7 above to forward to both email addresses.
Setting up an Email for Sending (free)
The following are a set of instructions that will allow you to send emails for free via a free Gmail account only. You will need to have already set up your domain name to receive emails prior to this.
- Go to your Gmail account and click on your icon/profile picture in the top right corner, hit Manage your Google Account
- On the left bar press Security
- Under the subheading Signing in to Google, is 2-Step Verification turned on? If not, follow the steps here
- If 2-Step Verification is On, then under it there should be an option for App Passwords - select this
- Under Select device, choose Other and enter some name
- Save the password output on this page, you will need it momentarily
- In Gmail go to Settings (Gear Icon) > Accounts and Import > Send mail as > Click Add another email address you own
- Enter in the Name you want to appear when you send things (e.g.
John Li) and the email address you want to use (e.g.me@johnli.com), leave Treat as an alias checked and hit Next Step. - Under SMTP Server enter
smtp.gmail.com, leave the value in Port as is. - Fill in Username with your gmail account (e.g.
johnli@gmail.com) and in the Password field enter the password you saved in Step 6. Hit Add Account. - Leave the window open and go check your email address you receive emails at for your domain name. You’ll receive an email titled
Gmail Confirmation - Send Mail as me@johnli.com. Copy the Confirmation code into the window and hit Submit. - To send an email out with your domain name email, compose a new email in Gmail. In the From field, click on the email displayed to choose an email to send from. (I had to close and reopen Gmail before it would send properly)
Yay! You’re done! Now you can easily send emails out of your domain name. You will need to do step 7-10 for every other email address in your domain name you want to use.
You should also note that the Gmail account you are using will be visible in the Email headers, so it is not fully anonymous (though the odds of someone knowing how to, and actually checking email headers are low). You can avoid this by doing a
more complex or paid option. Otherwise, if you don’t think this is a big deal (e.g. you normally email out of johnli@gmail.com) then carry on anyway. If you’d like to see for yourself the effort level required to see the original email account in your email headers, send a test email to another email address you own (e.g. not the same Gmail account):
-
Outlook (desktop application): Open the email in a new window, press File -> Properties, and scan through the wall of text in the Internet Headers box for Gmail address
-
Gmail (desktop browser) Press the three dots, Show Original and scan through wall of text for Gmail address.
That’s It!
You’re done.
In my original draft, I made a lot of musings about what other easy or cost-effective possibilities you could have, including options for building and hosting a personal website. You can read my thoughts here.